Installation#
OpenLane uses Docker images that contain binaries, libraries and packages all ready-to-use. All of the flow tools are encapsulated inside the container image.
Open source projects typically have to address the challenge of various user environments, operating systems, virtual machines, cloud-based distribution etc. Docker images alleviate this problem.
Installation steps#
Step 1. Installation of Required Packages#
For OpenLane you need a couple of tools installed:
Linux (or the Windows Subsystem for Linux) or macOS
Docker 19.03.12+
Git 2.35+
- Python 3.6+
pip
venv
GNU Make
After installing all of the above, proceed to Step 2. Making Docker available without root.
Installing Dependencies under Ubuntu#
Only Ubuntu 20.04 and above are supported. Most complex utilities are included in the Docker image, so the installation list is quite slim:
sudo apt install -y build-essential python3 python3-venv python3-pip git
Next, you’ll need install Docker. Follow the as steps provided below may be out of date.
Warning
The following steps may become out of date. You may want to follow the official Docker documentation here.
# Remove old installations
sudo apt-get remove docker docker-engine docker.io containerd runc
# Installation of requirements
sudo apt-get update
sudo apt-get install \
   ca-certificates \
   curl \
   gnupg \
   lsb-release
# Add the keyrings of docker
sudo mkdir -p /etc/apt/keyrings
curl -fsSL https://download.docker.com/linux/ubuntu/gpg | sudo gpg --dearmor -o /etc/apt/keyrings/docker.gpg
# Add the package repository
echo \
   "deb [arch=$(dpkg --print-architecture) signed-by=/etc/apt/keyrings/docker.gpg] https://download.docker.com/linux/ubuntu \
   $(lsb_release -cs) stable" | sudo tee /etc/apt/sources.list.d/docker.list > /dev/null
# Update the package repository
sudo apt-get update

# Install Docker
sudo apt-get install docker-ce docker-ce-cli containerd.io docker-compose-plugin

# Check for installation
sudo docker run hello-world
A successful installation of Docker would print out something like this:
After installation you will get Hello World of Docker:

Hello from Docker!
This message shows that your installation appears to be working correctly.

To generate this message, Docker took the following steps:
1. The Docker client contacted the Docker daemon.
2. The Docker daemon pulled the "hello-world" image from the Docker Hub. (amd64)
3. The Docker daemon created a new container from that image which runs the executable that produces the output you are currently reading.
4. The Docker daemon streamed that output to the Docker client, which sent it to your terminal.

To try something more ambitious, you can run an Ubuntu container with:
$ docker run -it ubuntu bash

Share images, automate workflows, and more with a free Docker ID:
https://hub.docker.com/

For more examples and ideas, visit:
https://docs.docker.com/get-started/
Proceed to Step 2. Making Docker available without root
Installation of required packages under macOS#
First install Homebrew then run script below to install the required packages:
brew install python make
brew install --cask docker
When Docker is done installing, you’ll need to launch the newly installed “Docker Desktop” app from Launchpad and follow instructions in the terminal.
Step 2. Making Docker available without root#
Warning
The following steps may become out of date. You may want to follow the official Docker documentation here.
If you’re using the Windows Subsystem for Linux or macOS you may skip this step, but if you’re running native Linux, this is a mandatory step without which all OpenLane scripts would fail.
Important
This is a MANDATORY step. Without this, most OpenLane scripts will be confused and error out with permission issues. This step caused a lot of confusion because a lot of users tend to assume just installing Docker is file. IF YOU ARE USING LINUX, DO NOT SKIP!
sudo groupadd docker
sudo usermod -aG docker $USER
sudo reboot # REBOOT!
You must restart your operating system for the group permissions to apply.
You can verify that the group has been added as follows:
id | grep -c docker
If you see an output of 1, you’ve added yourself to the docker group successfully.
Step 3. Checking the Docker Installation#
If every thing has been set up correctly, you can run the Docker hello-world image without root. To test, it use following command:
You will get a happy little “Hello, world!” message, once again, but this time without root.
Hello from Docker!
This message shows that your installation appears to be working correctly.

To generate this message, Docker took the following steps:
1. The Docker client contacted the Docker daemon.
2. The Docker daemon pulled the "hello-world" image from the Docker Hub.
   (amd64)
3. The Docker daemon created a new container from that image which runs the
   executable that produces the output you are currently reading.
4. The Docker daemon streamed that output to the Docker client, which sent it
   to your terminal.

To try something more ambitious, you can run an Ubuntu container with:
$ docker run -it ubuntu bash

Share images, automate workflows, and more with a free Docker ID:
https://hub.docker.com/

For more examples and ideas, visit:
https://docs.docker.com/get-started/
Troubleshooting Step 3.#
If you get Docker permission error when running any Docker images:
OpenLane> docker run hello-world
docker: Got permission denied while trying to connect to the Docker daemon socket at unix:///var/run/docker.sock: Post "http://%2Fvar%2Frun%2Fdocker.sock/v1.24/containers/create": dial unix /var/run/docker.sock: connect: permission denied.
See 'docker run --help'.
OpenLane>
Then you skipped a step or two. You forgot to follow Step 2. Making Docker available without root or restart your Operating System.
Step 4. Checking Installation Requirements#
In order to check your installation, you can run the following commands:
git --version
docker --version
python3 --version
python3 -m pip --version
make --version
python -m venv -h
Successful outputs look something like this:
$ git --version
git version 2.36.1
$ docker --version
Docker version 20.10.16, build aa7e414fdc
$ python3 --version
Python 3.10.5
$ python3 -m pip --version
pip 21.0 from /usr/lib/python3.10/site-packages/pip (python 3.10)
$ make --version
GNU Make 4.3
Copyright (C) 1988-2020 Free Software Foundation, Inc.
License GPLv3+: GNU GPL version 3 or later <http://gnu.org/licenses/gpl.html>
This is free software: you are free to change and redistribute it.
There is NO WARRANTY, to the extent permitted by law.
$ python3 -m venv -h
Built for x86_64-pc-linux-gnu
usage: venv [-h] [--system-site-packages] [--symlinks | --copies] [--clear]
            [--upgrade] [--without-pip] [--prompt PROMPT] [--upgrade-deps]
            ENV_DIR [ENV_DIR ...]

Creates virtual Python environments in one or more target directories.

positional arguments:
ENV_DIR               A directory to create the environment in.

options:
-h, --help            show this help message and exit
--system-site-packages
                        Give the virtual environment access to the system
                        site-packages dir.
--symlinks            Try to use symlinks rather than copies, when symlinks
                        are not the default for the platform.
--copies              Try to use copies rather than symlinks, even when
                        symlinks are the default for the platform.
--clear               Delete the contents of the environment directory if it
                        already exists, before environment creation.
--upgrade             Upgrade the environment directory to use this version
                        of Python, assuming Python has been upgraded in-place.
--without-pip         Skips installing or upgrading pip in the virtual
                        environment (pip is bootstrapped by default)
--prompt PROMPT       Provides an alternative prompt prefix for this
                        environment.
--upgrade-deps        Upgrade core dependencies: pip setuptools to the
                        latest version in PyPI

Once an environment has been created, you may wish to activate it, e.g. by
sourcing an activate script in its bin directory.
Step 5. Download OpenLane#
Download OpenLane from GitHub:
git clone --depth 1 https://github.com/The-OpenROAD-Project/OpenLane.git
cd OpenLane/
Successful download will look like this:
git clone --depth 1 https://github.com/The-OpenROAD-Project/OpenLane.git
cd OpenLane/
Cloning into 'OpenLane'...
remote: Enumerating objects: 471, done.
remote: Counting objects: 100% (471/471), done.
remote: Compressing objects: 100% (393/393), done.
remote: Total 471 (delta 66), reused 279 (delta 35), pack-reused 0
Receiving objects: 100% (471/471), 2.78 MiB | 4.91 MiB/s, done.
Resolving deltas: 100% (66/66), done.
Step 6. Download the Docker Image and Install sky130 PDK#
Download the Docker image of OpenLane and install sky130 PDK:
make
If you are planning to use other PDK, then you need to follow the PDK installation guide for that specific PDK.
Step 7. Validating your OpenLane Installation#
Test the installed PDK and OpenLane:
make test # This a ~5 minute test that verifies that the flow and the pdk were properly installed
Sucessful test looks like this:
Basic test passed
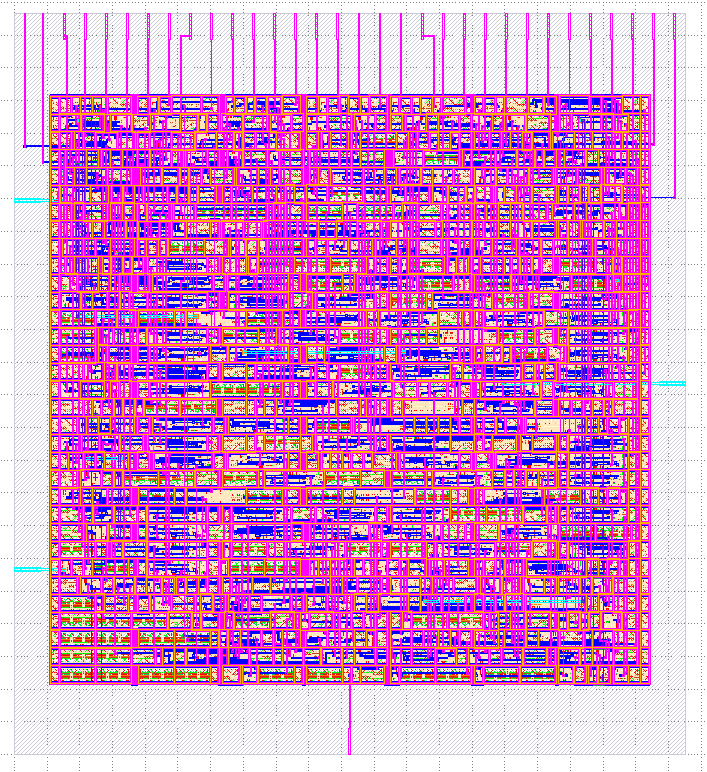
Step 8. Optional: Viewing Test Design Outputs#
On Linux, you can open the final layout of the test design using KLayout. This will open the window of KLayout in editing mode -e with the sky130A process.
# Enter a Docker session:
make mount

# Open the spm.gds using KLayout with sky130 PDK
klayout -e -nn $PDK_ROOT/sky130A/libs.tech/klayout/sky130A.lyt \
   -l $PDK_ROOT/sky130A/libs.tech/klayout/sky130A.lyp \
   ./designs/spm/runs/openlane_test/results/final/gds/spm.gds

# Leave the Docker
exit
Updating OpenLane#
Run following commands to update the OpenLane:
cd OpenLane/
git pull --depth 1 https://github.com/The-OpenROAD-Project/OpenLane.git master
make
make test # This is to test that the flow and the pdk were properly updated
It is very similar to installation, one difference is that we pull the changes instead of creating a new workspace. Git pull, by default, will not remove any files in your workspace.